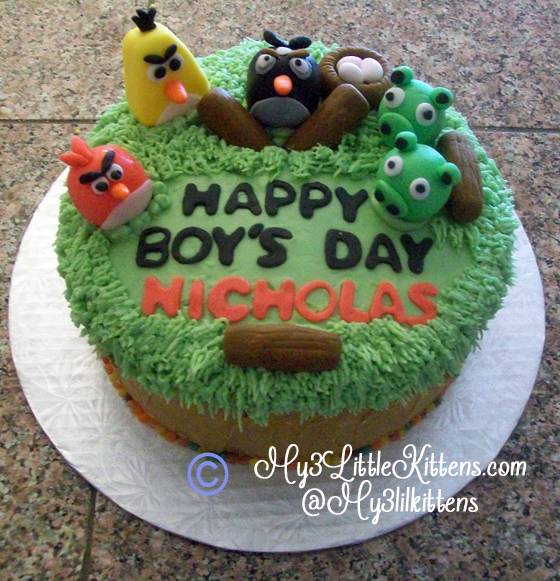
Angry Birds Cake Decorating Tutorial
One of my very favorite hobbies is cake decorating. I find it both challenging and relaxing at the same time. So when I got the chance to create an Angry Birds Cake, I couldn’t resist. While it definitely threw me out of my “comfort zone,” it also allowed me to improve my skills and add another addition to the many cakes I have created! So for Angry Birds fans everywhere, here is a tutorial on making your own adorable Angry Birds Cake!
To begin, I baked a 2-layer 9-inch round cake, which I leveled. I then set the layers together with Homemade Buttercream frosting. After the foundation of the cake was done, I set to work on creating the Angry Birds Characters out of Fondant. I tinted white fondant with Wilton Color Dyes and shaped each character by hand.
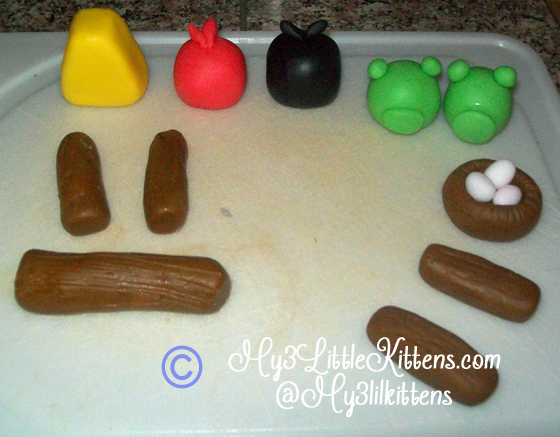
♥ The red bird, black bird and pigs are round, so they are formed by rolling the tinted fondant into a circle shape. I then used gum paste adhesive to add the fondant “hair” for the birds as well as the pig snouts and ears. The ears are rolled fondant and the snouts are rolled fondant that has been flattened on one side.
♥ The yellow bird was done by creating a triangle and then taking each edge and flattening it against a hard surface.
♥ The logs are done by rolling the fondant with an open hand into the desired length and using either a Wilton brush tool or a toothpick to draw log lines for appearance.
♥ The nest was done by rolling fondant into a circle, pushing down into the middle of it with my thumb and using the brush tool {or even a toothpick} to draw accents.
♥ The eggs in the nest were simply rolled into balls and then rolled some more to created the egg shape.
I recommend letting each shape harden for roughly an hour before adding additional fondant or details. The additional eyes, beaks, etc. are all added using gum paste adhesive.
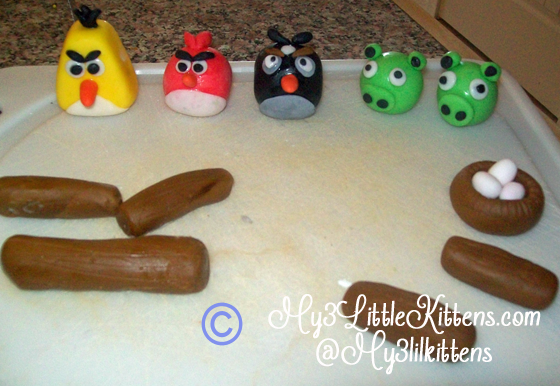
♥ The eyes and black snout holes were done by rolling fondant into a circle and flattening.
♥ The beaks were rolled into elongated shapes and I squeezed the tips between my thumb and middle finger to form a peak.
♥ The eyebrows are rolled into elongated shapes and flattened.
♥ The tummy colors were done by cutting out the fondant in a circle shape and flattened until very thin.
After they are complete, I would let them sit for at least an hour to dry before placing them onto your cake.
To finish the cake, I colored Buttercream Frosting green and used a spatula to put a thin, green layer of frosting on the top of the cake. I cut out fondant letters for the writing, arranged the Angry Birds Characters as I wanted them and used Wilton Tip # 233 to pipe out green frosting as the grass. I used brown frosting on the sides and finished the cake with lollipop candy circles around the bottom.
I hope this helps you create your next “Cake Masterpiece” and be sure to check out some of my other creations and recipes!

Stephanie Hungerford says
I love this cake it looks fun a fairly easy to make
Darlene Schuller says
Congratulations on the feature!! This cake is amazing, perfect for my son’s birthday in february!
Elizabeth Matthiesen says
fantastic, you have done a marvellous job of that cake.:-)
Kristen says
Thank you so much Elizabeth!!!!
Andrina G says
You have talent! That cake looks amazing.
Kristen says
Thank you so much Andrina. Cake decorating really is something I truly enjoy doing!
christine says
LOVE IT!!! Thanks! This may be the next cake I make!
Kristen says
Thank you so much Christine!!! I would absolutely LOVE to see you do this cake! Little one would be seriously impressed!!! The Disney Princess cake you made for her was also pretty awesome!
Tiffany Wilson says
Great job! My son would love this!
Piroska says
I love this cake! Your tutorial makes it look so easy, and I think I will try it for my nephew’s birthday.
Kristen says
I bet he would LOVE it!!!!! Thanks so much!
caryn s says
I love this cake! I will have to make this for my son’s birthday!
Kristen says
Thank you and I bet he would LOVE it!!!!
Christy Martin says
Very impressive! I have never worked with fondant, but I would be up for the challenge. Great job!
Kristen says
Thanks Christy!!!!!
Susan T. says
OMG! Those little pigs are so cute. In the game I HATE those pigs! Lol!
Kristen says
Haha…Same here!
loriag says
What a great cake. Wonderful job, and thanks for sharing.
Kristen says
Thank you!
MrDisco says
wow!! that’s amazing!
Kristen says
Thank you so much!!
kathy downey says
wow,just love it,you sure have a talent
Kristen says
Thank you so much Kathy!
kathy downey says
Grandkids and I tried our luck making the angry bird cake Easter weekend for fun,they thought it was easy from your photo. We sure ended up with an angry cake it was horrible but we sure had a lot of fun and laughs
Kristen says
I am sure they enjoyed every minute, which made it all worth it! I bet it was super yummy!
mrdisco says
that’s an awesome tutorial
Laurie P says
What a beautiful cake! Great tutorial 🙂
very well done!
Elizabeth Matthiesen says
you’ve made a wonderful job of decorating this cake, marvellous, a job well done. 🙂
fionpu says
You did an amazing job. You should open a cake shop…it’s professional. Thanks for the tutorial…Will try to this when possible.
Kristen says
Thank you so much!!!!!
Amy Lovell says
Wow! Thanks for this! Will be great for my DD’s bday she loves them!
kathy downey says
Going to give this another try for my grandson birthday in Dec.
Amy Lovell says
Thanks this is very cool my daughter would love this!
kathy downey says
This i believe is the cutest cake ive seen in awhile